What is the snipping tool in windows 7? It enables you to take snapshots of your computer screen quickly and easily. This is extremely useful if you are creating blog tutorials on how to use any particular program and need to take key snapshots of the process.
Photoshop used to be the most popular method to accomplish this, but the snipping tool in windows 7 is easier, quicker, and cheaper(free).
How to take a snapshot using the snipping tool in windows 7
- Open the snipping tool.
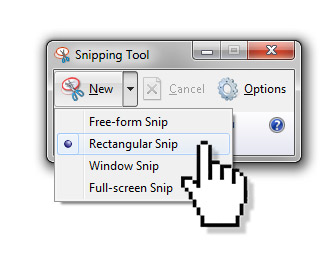
- Click the down arrow next to the 'New' button and make sure the 'Rectangular Snip' option is selected.

This option allows you to drag a rectangle shape for your snip, and I think it's the most aesthetic snip option. - Press (Ctrl+n) when you want to take a snip. The screen behind the Snipping Tool will turn a hazy white.
- Place the cursor above and to the left of the area, you want to snip, press and hold down the left mouse button, drag the cursor the bottom right of the area you want to snip then release the mouse button.
- You can now use the pen and highlighter tools to markup your new snipping.
- When you're down click 'File' and 'Save As...'.
This is the best snipping tool that I know of for Windows program tutorial blogging.


Before you post, please prove you are sentient.
Wait! The answer you gave wasn't the one we were looking for. Try another.
What is 8 * 8?