In this tutorial, I will show you how to add an image, a logo, blog, 'About' page, 'Contact' page, side bar, +1 button, sidebar text element, AdSense and copyright footer text using Google Sites. First create a Google Sites account. Once you've created your Google Sites account, log into the account.
Note: In order to complete the 'How to create a sidebar AdSense ad' tutorial, you will need an AdSense account already created.
In order to complete the 'How to create a contact page' you will need to have a Google Docs account already created.
'Google Sites How To' tutorials begin:
How to create a Google Site
First we're going to create a 'site'.
- Go to google.com/sites and sign in (hopefully you use the same sign in information for all your Google accounts.)
- Click on the red 'CREATE' button on the left side of the screen.
- Click select on the 'Blank template' icon.
- Type in the name of your site in the 'Name your site:' field.
- type in a URL for your site in the 'Site location' field. It has to be unique, so keep trying till you find a url name you can settle with.
- Type the 'captcha' in the field.
- Click the "create Site' button.
Your site is created. Add new elements to your site using the tutorials below.
How to add a new logo
- Click the 'More' button at the top of the screen.
- Click 'Manage site' from the drop down menu.
- Uncheck the box 'Show site name at top of page' near the top of the page.
- Click the 'SAVE' button.
- Click 'Site layout'.
- Click the 'Change logo' link in the 'header area'.
- Check the 'Custom Logo:' radio button.
- Click the 'Choose File' button.
- Navigate to a directory on your computer where you have the custom logo, select it, and press the 'Open' button.
- Click the 'OK' button.
- Click the 'SAVE' button.
- Click the name of your site listed under the 'Manage Site' page title, to return to your homepage
How to create a blog
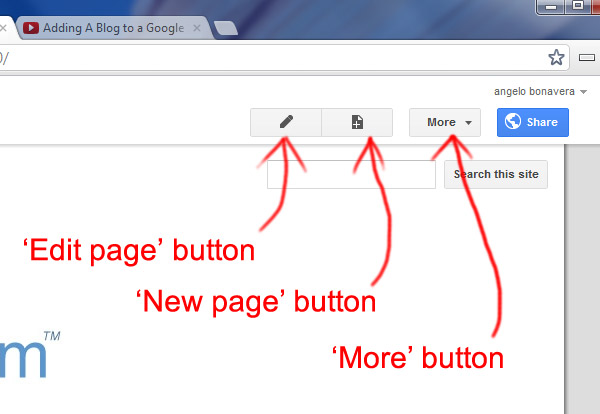
- Click the 'New page' icon at the top of the screen.

- Type 'Blog' in the 'Name your page' field.
- Select 'Announcements' from the 'Select a template to use' menu.
- Click the 'CREATE' button.
- You can easily add posts by selecting navigating to your "blog' page and clicking the 'New post' button.
- Don't forget to click the 'Save' button at the top of your screen when you're done writing your posts.
How to create a contact page
- First we're going to create a contact form using Google Docs, so log into your Google Docs account: http://google.com/docs.
- Click the 'CREATE' button.
- Select 'Form'.
- Enter in 'Contact Form' in the field Titled 'Untitled form'.
- In the 'Question Title' field type 'What is your name?'.
- In the 'Help Test' field type 'Enter your first and last name."
- Set the 'Question Type' to 'Text'.
- Check the box next to 'Make this a required question.'
- Click the 'Done' button.
- Mouse hover over the 'Sample Question 2' field and click the 'pencil' edit icon button.
- In the 'Question Title' field enter 'What is your email address'.
- In the 'Help Text' field enter 'Enter you email address'.
- Set the 'Question type' to 'Text'.
- Check the box next to 'Make this a required question'.
- Click the 'Done' button.
- Click the 'Add item' button at the top of the screen.
- Select 'Paragraph text'.
- In the 'Question Title' field enter 'What is your message?'.
- In the 'Help Text' field enter 'Enter your message here'.
- Set the 'Questions type' to 'Paragraph text'.
- Check the box next to 'Make this a required question'.
- Click the 'Done' button.
- Click 'More actions' at the top of the screen.
- Click 'Edit confirmation'.
- Replace the default text in the field with 'Thank you for contacting us, we will respond shortly.'.
- Click the 'Save' button.
- Click the 'See responses' button.
- Click 'Spreadsheet'. When someone sends their information, it will be saved to this spreadsheet so keep that in mind.
- Click on 'Tools'.
- Click on 'Notification rules'.
- Check the box 'A user submits a form'.
- Check the box 'Email - right away'.
- Click the 'Save' button.
- Click the 'Done' button.
- Click on 'Form'.
- Click on 'Edit form'.
- In the popup window click the 'More actions' button.
- Click 'Embed'.
- Copy the code snippet and close the popup windows.
Creating the contact page on Google Sites: - Click the 'New page' icon button.

- Enter 'Contact' in the 'Name your page:' field.
- Click the 'Create' button.
- Click the small '<HTML>' button at the top of the screen.
- Paste the contact form code snippet into the field.
- Click the 'Update' button.
- Click the 'Save' button at the top of the screen.
How to create a sidebar +1 button.
- Click the 'More' button and choose 'Manage site' from the drop-down menu.
- Click 'Site layout' from the left side of the screen.
- Click the 'Add a sidebar item' button.
- Click the 'Add' button under the '+1 button' feature.
How to create a sidebar Text item.
- Click the 'More' button and choose 'Manage site' from the drop-down menu.
- Click 'Site layout' from the left side of the screen.
- Click the 'Add a sidebar item' button.
- Click the 'Add' button under the 'Text' feature.
How to create a sidebar AdSense ad.
- Click the 'More' button and choose 'Manage site' from the drop-down menu.
- Click 'Site layout' from the left side of the screen.
- Click the 'Add a sidebar item' button.
- Click the 'Setup AdSense' button.
- Click the 'Sign up for AdSense' button.
- Check the 'Use an existing AdSense account' bullet.
- Fill in the fields and press the 'Next' button.
- Click the 'Add' button under 'Display Ads' area.
- Click the name of your site, that appears under the 'Manage Site' page title, to get back to the site management area. Notice the Google Ads in the sidebar of the page.
How to put copyright information in the footer
- Click the 'More' button at the top of the page.
- From the drop-down menu, click 'Manage site'.
- Click 'Site layout'.
- Click the 'Change site layout' button.
- Check the bullet next to 'Footer'
- Click the 'OK' button.
- Click the 'Edit footer content' link in the footer area.
- Use the WYSIWYG editor to enter your HTML, text and images.
- Click the 'OK' button to save your changes.
Here the copyright symbol if you need to copy it into your footer area: © - Click the 'SAVE' button at the top of the page.
- Click the name of your site listed under the 'Manage Site' page title, to return to your homepage.
How to create 'About me' page
- Click the 'New page' icon at the top of the page.

- Enter the name of the page in the 'Name your page:' field.
- Click the 'CREATE' button at the top of the page.
- Enter your contact page information in the field then click the 'Save' button.
How to add an image
I'm going to show you how to add an image in your Google Site's 'About me' page, but the process can be used for any page type.
- Navigate to your 'About me' page and click the 'Edit page' icon button.

- Place the cursor where you want the image to appear.
- Click the 'Insert' link at the top of the screen.
- Click the 'Image' option from the drop-down menu.
- Click the 'Choose File' button.
- Navigate toa directory on your computer where you have the image stored and select it and click 'Open'.
- Click the 'OK' button.
- Clicking on the image in the content area will make formatting options appear.


