Some custom themes allow you to create an online portfolio with WordPress. Each theme would have a unique way to go about it, so I can give you instructions on how to use your particular theme. I can show you how to create a portfolio using WordPress's built in 'Gallery', category and 'Page' options.
In this example I will create a photography Portfolio page and 2 sub category pages structured like this.
Photography
Portraits
Landscapes
First let's create the Portfolio page
Note: Our portfolio page is not really a page for our purposes, i.e. we don't want people to click on the portfolio page link and end up on an actual page. The portfolio page link for this example is simply a nav bar item. We want visitors to scroll over so that our two categories can drop down. When visitors click on a category link, they will then be led to a page.
- Log into your WordPress admin
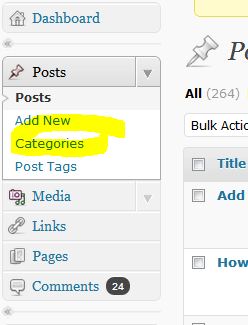
- Click on the 'Categories' under the 'Posts' option.

- Enter 'Portfolio' into the 'Name' field.
- Click the 'Add New Category' button.
Next lets create the 'Portraits' page
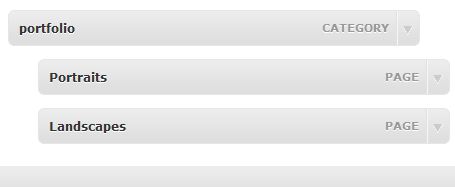
Note: The Portraits and Landscapes WordPress pages we create will serve as the category sub menu of our portfolio link in the main navbar.
- Click on 'Pages'.
- Click the 'Add New' button.
- In the title field type 'Portraits'.
- Type in a description of your Portraits page.
- Carriage return to the next line and click the 'Add An Image' icon.
- Navigate to a directory on your computer where you have the portraits, select then and press the 'Open' button.
Note: hold down the 'CTRL' key to select more them one image in Windows. - Click the 'Save all changes' button.
- Click the 'Insert gallery' button.
- Click the 'Publish' button.
Next lets create the 'Landscapes' page
- Click on 'Pages'.
- Click the 'Add New' button.
- In the title field type 'Landscapes'.
- Type in a description of your Landscapes page.
- Carriage return to the next line and click the 'Add An Image' icon.
- Navigate to a directory on your computer where you have the landscape photos, select them and press the 'Open' button.
- Click the 'Save all changes' button.
- Click the 'Insert gallery' button.
- Click the 'Publish' button.
Last we will arrange our pages on the nav bar
- Click on 'Menus' under 'Apearance'.
- Check the 'View All' link under the 'Categories' area.
- Check 'Portfolio' and click the 'Add to menu' button. You will see the menu button pop unto the nav menu area.
- Check 'Landscapes' and 'Portraits' in the 'Pages area.
- click the 'Add to menu' button. You will see the menu buttons pop unto the nav menu area.
- Drag the 'Landscapes' and 'Portraits' items so that they're indented right underneath the 'Portfolio' item.

- Click the 'Save Menu' button.
That's it, now when you view your website, you will have a portfolio.


Before you post, please prove you are sentient.
Wait! The answer you gave wasn't the one we were looking for. Try another.
What is melted ice?